Posts

Showing posts from July, 2017

Roborace Showcase at MCity

Image
On last Friday, which was May 21st, Roborace visited Mcity in the University of Michigan to show case its autonomous race car, Robocar. Robocar's first impression was astounding. Previous self-driving cars involved regular cars with regular seats. However, this race car was designed so that there is no seat. It looked like Formula 1 race cars with a higher cool factor. To achieve the autonomy, the race car uses a combination of Lidars, Radars, Sonars, and computer vision cameras. Unlike traditional self driving cars which has a roof mounted Lidar, Robo race has a couple of Lidar in the front wheel wells. I wonder the benefits of the side mounted Lidars over top mounted Lidars. I predict that due to its low height, top-mounted Lidar might cause a line of sight issue. As a consequence of side mounted Lidar in the front, the car introduces a blind spot due to large back wheel wells. Therefore, the back wheel is mounted with Sonars to compensate. In the top of the car seats the c

Let’s Build 5V Solar Charger Part 2

Image
Let’s Build 5V Solar Charger Part 2 Last week, I assembled step-up boost converter kit and put 6V solar panel to power up the chip. I did a final assembly inside a metal casing and taped the solar panel around the case to make the kit tidy as shown in the photo below. This week, I measured the output of the solar charger. I measured the open circuit voltage and short circuit current to calculate the power output. The voltage was measured at around 6V and current was measured at around 0.03Amp. This translates to around 200mW of energy. This is 1/5 of what the solar panel was advertised at. The product page advertised at 1W of output. I expected that the tiny circuit wouldn’t able to charge a power hungry smartphone. However, this might be sufficient enough to charge a small LED light for my bike. Considering that normal USB port’s maximum current output is 500mW, the solar panel’s output is decent.  For curiosity, I calculated how much energy I could save using

Let’s Build 5V Solar Charger

Image
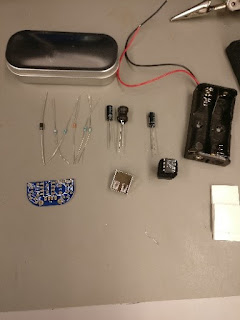
I am taking an online summer class at University of Minnesota regarding renewable energy. I took a project of building a solar charger to charge my bike LED light. This will be a fun small project. The items used for this project are Adafruit phone charger kit and 6V 1W solar panel.               The above kit is a basic step-up converter circuit PCB that converts a variable input voltage to 5V output. It is meant to use two 1.5V battery cells. However, for this project, I will use a solar panel instead. The solar panel is advertised to output 6V. According to the LTC1302 datasheet of the boost converter used in this kit, the input voltage has a range from 2V to 8V. Therefore, this solar panel rated for 6V output should be appropriate for this build. I soldered all the parts according to the instruction here: https://learn.adafruit.com/minty-boost/solder-it . This is an easy task to people who have prior experience with soldering. Next week, I will demo

Current Sensing 101

Image
Current Sensing 101 Now that starter project is done, it is time for real research. For the past week, I have been thinking of using current sense resistors for my research project. This blog post will introduce concepts of current sense resistors and how to use them. Measuring current using current sense resistor, op amp, ADC, and MCU The standard method of measuring current is to measure voltage drop over a resistor. The topology is shown in the above schematics. Ohm’s law can be applied to convert voltage measurement to current value using I = V/R. Current sense resistors are high precision low ohm resistors ranging from microohm to milliohms. Consider a 12V power source with a variable load resistance from 250 Ω to 1000 Ω . This converts to a current draw range of 12mA to 48mA. The voltage drop over a 0.01 Ω current sense resistor then ranges from 12uV to 48 uV. These are very small numbers and need to be amplified to the microcontroller voltage range of 0V